Thursday, January 24, 2013

HAPPY NEW YEAR!

I can finally post...Blogger has fixed the image upload.....Yeah!!!!!!!


      I would like to wish everyone a year of
Hope, Joy and Peace...


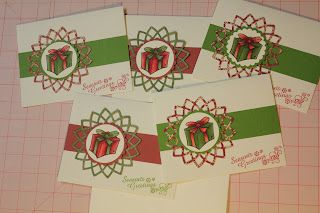
      The month of December was a blur. I could not believe how fast  Christmas came and I didn't  have a chance to post a blog, so today, I will show you some of the Christmas cards I made. They are very simple and flat because it is very costly to send more than fifty cards in the mail when they are bulky with ribbons and gems.


I went to my Stampin-Up demonstrators home before Christmas to make these three dimensional ornaments.


We used the "Ornament Keepsakes" and the matching "Framelits Dies". The first ornament was made using the vanilla cardstock and Tempting Turquoise ink pad. The second ornament was made using the vanilla cardstock and Not Quite Navy ink pad. They are just gorgeous!!!
 
Hope you are having a good day!


Tuesday, October 30, 2012

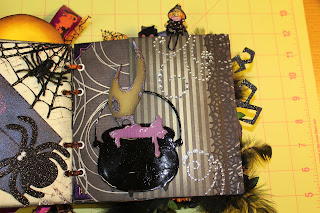
My Finished Halloween Mini Album

     I've finished my mini  album today after working on it for a month.


     Here is a list of products I used to make this album:
 
 
K and Company
 
Halloween by Tim Coffey
 
Spooktacular
 
sheets from an unknowwed paper pack
 
Ribbons
 
some of the ribbons are from my stach(I don't know where I bought them)
 
Dollarama ribbons
 
Cartridges
 
Mini Monsters
 
Happy Hauntings
 
Picturesque
 
Embellishments
 
Recollections glittered die cuts from last year
 
Dollar stores  Halloween decorations
 
Recollections adhesive rhinestones
 
Stikles in black, orange, purple and green
 
Stamps
 
Three stamps from Recollections called
 
Skeletons
Witch
Haunted House
 
Punches
 
Martha Stewart spider and web border punches
 
Flowers
 
Daisy Doodles from Michaels
flowers I made from the Tim Holtz alterations Tattered Pinecone
(love that die)
 
 
     I hope you enjoyed viewing my album.  
 
 
                     Happy Halloween!!!!
 
 
                                   Paulette


Monday, October 29, 2012

Desk Set and Halloween

      I've been quite busy working on a Halloween mini album.  Here is a sneak peak:


As soon as it is completed I will post pictures.

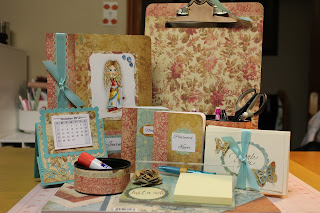
      I wanted to show you today three desk sets that I made as donations for my mom's Fall Church Tea. I spray painted and decorated two different size of cans: one for scissors and pens and the other was for paper clips, erasers...etc. I also decorated two different size of composition books.  One large  for a journal and two small ones; a Password Keeper and the other is a notebook. In addition, I put together a calendar that can be folded flat or standing up. A clipboard and a set of cards were also added to the set.      
     
      The last thing I made for the set was a telephone notepad made with a plastic frame that comes from  Dollarama and a Post It note pad. The three sets were decorated with different paper pads from K and Company.  Then I wrapped them in cellophane clear plastic and tied them with matching ribbon.


     Happy Halloween!

           Paulette

Tuesday, October 2, 2012

Fall

      Just taking a moment to show you my front yard.

     
    Flowers on each end are from my summer pack.  I didn't need to my buy the fall ones.  The temperature in Sudbury, Ontario, Canada is still warm enough and I couldn't put all of this on my small porch.  I used the next door neighbors' fence to attach the dried corn stalks. As I was putting it all together, several cars stopped  to tell me how wonderful it looked.

Happy Fall everyone!

Paulette       

Thursday, September 27, 2012

Scrapbooking

        Oh my goodness, I have not blogged for over a month!!!! I was very busy crafting or running around for social engagements but I am back today to add a double layout that I completed a couple of weeks ago, showing pics of my youngest son's 1st birthday almost 15 years ago.


      Way back when, I used to cut around my photos with scissors. This is the reason the pics are not rectangular.  It costs too much now to get new photos developed from the old negatives, therefore I use them anyways.  The pattern paper comes from Costco. It was a file folder container with over two hundred double sided cardstock sheets.  I loved the grey and reddish burgundy together and added some black.  The border  was made with a MS border punch.   Then I added a cake, balloons and a cell phone in blue, green and yellow to add a splash of color.  I used the following cartridges: Everyday Pop Up Cards and Create a Critter.


         I finished the layout with a Happy Birthday from the Celebrate With A Flourish Cartridge.  I put a cell phone on the page because my son received  a toy cell phone as a birthday gift.


Thanks for stopping by.

Paulette

Thursday, August 16, 2012

Congratulations On Your Wedding Day

Good afternoon,

      I would like to show you a card that I just completed for my cousin's wedding.


     The wedding dress was cut in ivory cardstock from the "Everyday Pop Up Cards".  I 


 embossed it with  the Cuttlebug "Floral Screen".  I added small flowers at the waist and at the bottom of the dress and  heat embossed them with the Stampin Up irridescent embossing powder.   Black pearls were added as centers.  I also cut a black shadow for the dress.


      The tuxedo was made with two hearts; one in white and one in black.  I snipped the black piece and folded the two parts to make the lapels.  I made a knot in 1/8" black ribbon and cut off the two ends and made a bow and glued it on the white heart. I took a black marker and drew buttons. I cut a small piece of ivory to decorate the pocket.

      The background was made from a black cardstock and an ivory pattern paper with gold lettering.  The paper comes from the  paper pack called Today, Tomorrow, Forever from "Me & My Big Ideas".  The black piece was cut from the "Elegant edges" cartridge, page 35. I used the Cricut Craft Room to cut it the size that I needed.


      I added the same three colors inside the card.  The black and ivory cardstocks were also cut with the "Elegant Edges".  I added a sentiment with black ink on ivory.


       I hope you all have a great weekend.  Till we talk again!

       Paulette


Tuesday, July 24, 2012

Sympathies/Avec sympathie

      I have a card to show you today that I made for my mother to send to her aunt from Gatineau, Quebec.

     The card and envelope was bought at Michaels. It is from the Recollections "Value Pack Blank Cards and Envelopes". There are 50 cards and envelopes. I bought the white, vanilla and black. 
    
     The  card measures 5 in X 6.5 in.  The base is black cardstock from my stash and cut at 1/4 in smaller than the card.  Then I added a Very Vanilla cardstock from Stampin' Up.  I cut  and glued a Kraft triangular piece of cardstock on the left side. I added a piece of black satin ribbon from Stampin' Up.  The stamp I used is from the "Just Believe" set from Stampin' Up. I stamped the image and the sentiment with Memento Tuxedo Black. I framed them with Kraft and black cardstock.  To finish off the card I added three gems on the upper right corner.  I also stamped the image on the envelope.


      I finished off the inside because I still had some leftover cardstock. I first layered with the Kraft cardstock and then added two pieces of black. I used a MS border on one of them. I cut out a Spellbinders Nestabilities Label Ten to be able to write a message.

 Till we talk again!

Paulette